Using the TimeZoneInfo class to display correct time for everyone in the world

This is just a short example how to display a DateTime with the correct time for everyone in the world. For this to work you need to persist all DateTime values as UTC when storing values.

DateTime.Add(TimeZoneInfo.FindSystemTimeZoneById(timeZoneId).GetUtcOffset(DateTime));
Where timeZoneId is a string with the name of the users timezone. 
Here are a list of the existing timezones. 
(The string left of = is the timeZoneId and the string to the right is the name of the timezone.)

Dateline Standard Time = (UTC-12:00) International Date Line West

UTC-11 = (UTC-11:00) Coordinated Universal Time-11

Samoa Standard Time = (UTC-11:00) Samoa

Hawaiian Standard Time = (UTC-10:00) Hawaii

Alaskan Standard Time = (UTC-09:00) Alaska

Pacific Standard Time (Mexico) = (UTC-08:00) Baja California

Pacific Standard Time = (UTC-08:00) Pacific Time (US & Canada)

US Mountain Standard Time = (UTC-07:00) Arizona

Mountain Standard Time (Mexico) = (UTC-07:00) Chihuahua, La Paz, Mazatlan

Mountain Standard Time = (UTC-07:00) Mountain Time (US & Canada)

Central America Standard Time = (UTC-06:00) Central America

Central Standard Time = (UTC-06:00) Central Time (US & Canada)

Central Standard Time (Mexico) = (UTC-06:00) Guadalajara, Mexico City, Monterrey

Canada Central Standard Time = (UTC-06:00) Saskatchewan

SA Pacific Standard Time = (UTC-05:00) Bogota, Lima, Quito

Eastern Standard Time = (UTC-05:00) Eastern Time (US & Canada)

US Eastern Standard Time = (UTC-05:00) Indiana (East)

Venezuela Standard Time = (UTC-04:30) Caracas

Paraguay Standard Time = (UTC-04:00) Asuncion

Atlantic Standard Time = (UTC-04:00) Atlantic Time (Canada)

Central Brazilian Standard Time = (UTC-04:00) Cuiaba

SA Western Standard Time = (UTC-04:00) Georgetown, La Paz, Manaus, San Juan

Pacific SA Standard Time = (UTC-04:00) Santiago

Newfoundland Standard Time = (UTC-03:30) Newfoundland

E. South America Standard Time = (UTC-03:00) Brasilia

Argentina Standard Time = (UTC-03:00) Buenos Aires

SA Eastern Standard Time = (UTC-03:00) Cayenne, Fortaleza

Greenland Standard Time = (UTC-03:00) Greenland

Montevideo Standard Time = (UTC-03:00) Montevideo

UTC-02 = (UTC-02:00) Coordinated Universal Time-02

Mid-Atlantic Standard Time = (UTC-02:00) Mid-Atlantic

Azores Standard Time = (UTC-01:00) Azores

Cape Verde Standard Time = (UTC-01:00) Cape Verde Is.

Morocco Standard Time = (UTC) Casablanca

UTC = (UTC) Coordinated Universal Time

GMT Standard Time = (UTC) Dublin, Edinburgh, Lisbon, London

Greenwich Standard Time = (UTC) Monrovia, Reykjavik

W. Europe Standard Time = (UTC+01:00) Amsterdam, Berlin, Bern, Rome, Stockholm, Vienna

Central Europe Standard Time = (UTC+01:00) Belgrade, Bratislava, Budapest, Ljubljana, Prague

Romance Standard Time = (UTC+01:00) Brussels, Copenhagen, Madrid, Paris

Central European Standard Time = (UTC+01:00) Sarajevo, Skopje, Warsaw, Zagreb

W. Central Africa Standard Time = (UTC+01:00) West Central Africa

Namibia Standard Time = (UTC+01:00) Windhoek

Jordan Standard Time = (UTC+02:00) Amman

GTB Standard Time = (UTC+02:00) Athens, Bucharest

Middle East Standard Time = (UTC+02:00) Beirut

Egypt Standard Time = (UTC+02:00) Cairo

Syria Standard Time = (UTC+02:00) Damascus

South Africa Standard Time = (UTC+02:00) Harare, Pretoria

FLE Standard Time = (UTC+02:00) Helsinki, Kyiv, Riga, Sofia, Tallinn, Vilnius

Turkey Standard Time = (UTC+02:00) Istanbul

Israel Standard Time = (UTC+02:00) Jerusalem

E. Europe Standard Time = (UTC+02:00) Minsk

Arabic Standard Time = (UTC+03:00) Baghdad

Kaliningrad Standard Time = (UTC+03:00) Kaliningrad

Arab Standard Time = (UTC+03:00) Kuwait, Riyadh

E. Africa Standard Time = (UTC+03:00) Nairobi

Iran Standard Time = (UTC+03:30) Tehran

Arabian Standard Time = (UTC+04:00) Abu Dhabi, Muscat

Azerbaijan Standard Time = (UTC+04:00) Baku

Russian Standard Time = (UTC+04:00) Moscow, St. Petersburg, Volgograd

Mauritius Standard Time = (UTC+04:00) Port Louis

Georgian Standard Time = (UTC+04:00) Tbilisi

Caucasus Standard Time = (UTC+04:00) Yerevan

Afghanistan Standard Time = (UTC+04:30) Kabul

Pakistan Standard Time = (UTC+05:00) Islamabad, Karachi

West Asia Standard Time = (UTC+05:00) Tashkent

India Standard Time = (UTC+05:30) Chennai, Kolkata, Mumbai, New Delhi

Sri Lanka Standard Time = (UTC+05:30) Sri Jayawardenepura

Nepal Standard Time = (UTC+05:45) Kathmandu

Central Asia Standard Time = (UTC+06:00) Astana

Bangladesh Standard Time = (UTC+06:00) Dhaka

Ekaterinburg Standard Time = (UTC+06:00) Ekaterinburg

Myanmar Standard Time = (UTC+06:30) Yangon (Rangoon)

SE Asia Standard Time = (UTC+07:00) Bangkok, Hanoi, Jakarta

N. Central Asia Standard Time = (UTC+07:00) Novosibirsk

China Standard Time = (UTC+08:00) Beijing, Chongqing, Hong Kong, Urumqi

North Asia Standard Time = (UTC+08:00) Krasnoyarsk

Singapore Standard Time = (UTC+08:00) Kuala Lumpur, Singapore

W. Australia Standard Time = (UTC+08:00) Perth

Taipei Standard Time = (UTC+08:00) Taipei

Ulaanbaatar Standard Time = (UTC+08:00) Ulaanbaatar

North Asia East Standard Time = (UTC+09:00) Irkutsk

Tokyo Standard Time = (UTC+09:00) Osaka, Sapporo, Tokyo

Korea Standard Time = (UTC+09:00) Seoul

Cen. Australia Standard Time = (UTC+09:30) Adelaide

AUS Central Standard Time = (UTC+09:30) Darwin

E. Australia Standard Time = (UTC+10:00) Brisbane

AUS Eastern Standard Time = (UTC+10:00) Canberra, Melbourne, Sydney

West Pacific Standard Time = (UTC+10:00) Guam, Port Moresby

Tasmania Standard Time = (UTC+10:00) Hobart

Yakutsk Standard Time = (UTC+10:00) Yakutsk

Central Pacific Standard Time = (UTC+11:00) Solomon Is., New Caledonia

Vladivostok Standard Time = (UTC+11:00) Vladivostok

New Zealand Standard Time = (UTC+12:00) Auckland, Wellington

UTC+12 = (UTC+12:00) Coordinated Universal Time+12

Fiji Standard Time = (UTC+12:00) Fiji

Magadan Standard Time = (UTC+12:00) Magadan

Kamchatka Standard Time = (UTC+12:00) Petropavlovsk-Kamchatsky – Old

Tonga Standard Time = (UTC+13:00) Nuku'alofa

Automatically create different Web.Config files for Debug and Release builds in Visual Studio 2010

This is a follow up on a post I did a couple of months back called, use both local and production connection string in the Web.Config using visual studio 2010, and I will here give you some more “meet” so you can use this in a more practical way.

When working on projects you will most likely use the Web.Config to store different parameters like connection strings to databases and other application settings. This settings are often specific to the machine you are developing on and will not likely be the same on the production server or the staging server. In Visual Studio there is built in support to have different values in the Web.Config file depending on what configuration you are using when you are building your projects. By default Visual Studio creates two configurations, Debug and Release.

Default usages of configurations in Visual Studio 2010

By default Visual Studio will use different configurations for different operations, it will use the Debug configuration when debugging your application on your local machine and it will use the Release configuration when you build your application using the Publish function.

image


Setting a different connection string for the Release configuration

A very useful thing to do automatically is to have the connection strings in your application automatically change to point to your production servers whenever you publish your web application. To do so you simply add the connection string element in the Web.Release.config file and add the following two xdt attributes

xdt:Transform="Replace" xdt:Locator="Match(name)"

What this does is it will replace the connection string matched by the name attribute.
Your connection string in Web.Release.config would now look like the following.

<add name="DB" connectionString="Server=ProductionServer;Database=DB;User ID=UserID;Password=PWD;" 
xdt:Transform="Replace" xdt:Locator="Match(name)" />

This code will replace the connection string in Web.config with the attribute Name=”DB” with the new connection string pointing to the production server.

Remove the debug=”true” attribute from the Release configuration

Another thing that is good to do when publishing your web app to the production servers is to disable debug mode by removing debug=”true” in the compilation section in web.system in the web.config file. This is easily done with a another xdt:Transform attribute called RemoveAttributes(name)

Just add the following code in Web.Release.config.

<compilation xdt:Transform=”RemoveAttributes(debug)” />

This will remove the attribute debug=”true” when publishing using the Release configuration.

Setting different custom error pages for the Release configuration

Lets say you are developing your app on a local machine and want to disable custom errors in the application during development you can do this by replacing the customErrors element in Web.config.

The following will let you enable custom errors to point to /errors/index.htm when your app is running in production code.

<customErrors redirectMode=”ResponseRewrite” defaultRedirect=”/errors/index.htm” mode=”On” xdt:Transform=”Replace” />

More transformation operators

There is three ways of locating the element you want transformed.

  • Condition(XPath expression)
  • Match(Comma-delimited list of one or more attribute names)
  • XPath(XPath expression)

There is also

  • Transform=”Replace”
  • Transform=”Insert”
  • Transform=”InsertBefore(XPath expression)”
  • Transform=”InsertAfter(XPath expression)”
  • Transform=”Remove”
  • Transform=”RemoveAll”
  • Transform=”RemoveAttributes(Comma-delimited list of one or more attribute names)”
  • Transform=”SetAttributes(Comma-delimited list of one or more attribute names)”

These are mostly self explaining in what they perform so I want go into details on this, you can read more about them on MSDN.

Creating a Composite Control in ASP.NET

Have you read my other post on custom controls?

A composite control is a custom web control that contains other web server controls. A composite control inherits from the CompositeControl class. You add constituent controls to this control. The composite control handles events raised by its child controls.

A composite control is rendered as a tree of constituent control, each having its own life cycle. Together, these constituent controls form a new control. Because each of the child controls handles its own ViewState and postback data, you don’t need to write extra code to deal with this.

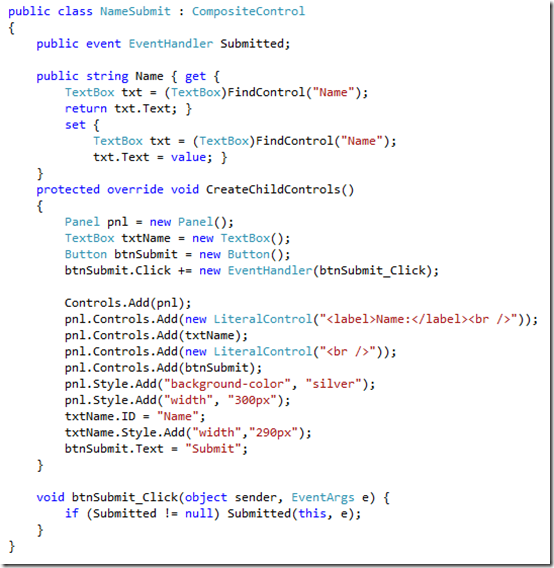
To create a composite control, you start by creating a class that inherits from the CompositeControl class and overrides the CreateChildControls method. The CreateChildControls method contains the code to instantiate the child controls and set their properties.

For the example of this post I will create a composite control that have a label, a textbox and a submit button.

image

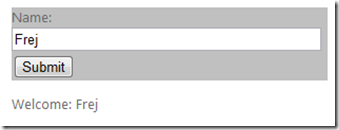
In this code the Name property is exposed to the developer using the control. An event called Submitted is also created so that users of the control can receive notification when the Submit button’s click event fires. The result of this control is the following.

image

And you can catch the Submitted event on the page like this.

image

image

The end result is the following.

image

Creating a Custom Web Server Control in ASP.NET using Visual Studio 2010

You can read my other blog post about custom user controls if you are more interested in that type of custom controls.

A custom web control is a control that you write that inherits either from the WebControl class or from an existing web server control, e.g the Textbox control in ASP.NET. Each custom control contains the code necessary to render the control. The control can be compiled to a DLL file that can be shared among applications.

There is two ways of creating a custom web control, the first is to inherit from a existing web server control and extend its functionality. The second is to inherit from the WebControl class which provides a base set of functionality. With this functionality you can handle styles such as BackColor and so on.

Inherit from an Existing ASP.NET Web Server Control

As an example of this approach lets create a custom web server control that will inherit from the Textbox control, and let the developer add a label to the textbox. This control can later be used on all pages that need a textbox with a label.

The first step when creating a custom web server control is to decide how to develop it. I have chosen to create my control in a new ASP.NET Server Control project in Visual Studio. This approach gives us the ability to build our control as a DLL an share it with other applications. As you will se when the first class added to this project will contain a template of a custom web server control with a quite a few attributes set to the class, property and method, this will be explained later in this post.

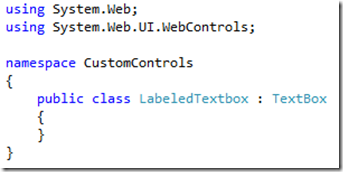
After adding a new class and set it to inherit from the TextBox class. You also need to reference the System.Web and System.Web.UI.WebControls.

image

For the label part of our custom web server control we need one property of type string that will be used as the label text.

image

The next step is to override a method from the TextBox class called Render. In this method we will add the rendering for the label. And at the end we call the base.Render() method to actually render the HTML of the inherited TextBox control.

image

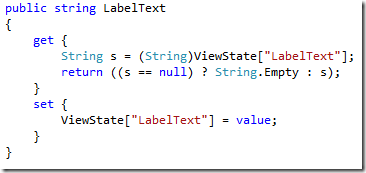
This control is almost finished, the only thing left to do is to provide the LabelText property with ViewState support. To do this you just change the get and set of the property to the following.

image

And the rendered control will look like this.

image


Inheriting Directly from the WebControl Class

Another approach to creating a custom web control is to create a control that inherits directly from the WebControl class. This is preferable when there is no existing control that provides enough default behavior similar to the control you want to implement. When inheriting from the WebControl class you, typically override the Render method to provide the HTML output you want for your control. How ever there is other Render methods shown below.

  • Render
    You can use the Render method when you want to control all output of your control’s HTML to the client.
  • RenderContents
    You use this method to ensure that the HTML for your control is rendered between the appropriate begin and end HTML tags. When Render is called on your control, it will call three methods in a sequence: RenderBeginTag, RenderContent, and RenderEndTag.
  • RenderBeginTag and RenderEndTag
    These methods are used to render HTML both at the beginning of a control listing and at the end. You override these methods when creating custom controls that display multiple controls between opening and closing tags.
  • RenderChildren
    If your custom control has child controls inside its ControlCollection, you can call this method to ensure that each is rendered as part of the HTML output.

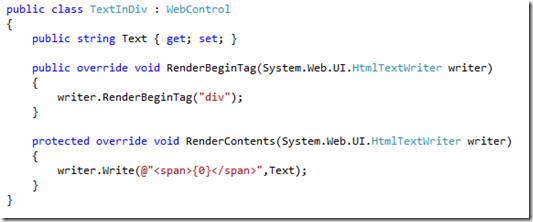
The following is a short example of how to create a control inheriting from WebControl.

image

The HTML markup generated by this control is the following.

image


Adding a Custom Web Server Control to a Web Application

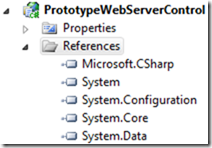
So far you have built a labeled textbox control, now lets see how we can add it to a web application project. In addition to use a custom web server control your project needs to reference it. If you develop your controls in the same solution you can right click the References and select Add Reference…

image 

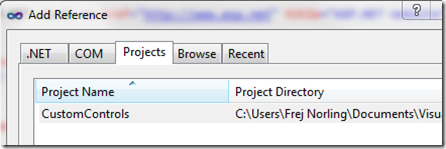
Select the project under the Project tab, and click Ok

image

When you build your project a copy of the DLL will be placed in your web application’s bin folder.

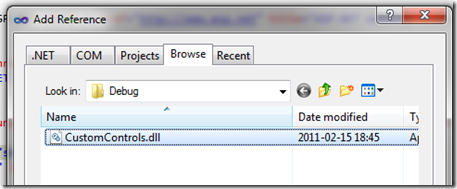
If share your control as a DLL assembly you can right-click the References in your project, select Add References and select the Browse tab instead.

image

Browse to the DLL file, select it and click Ok. A copy of the DLL will be placed in your web applications bin folder when you build the project.

Now you need to reference the assembly and namespace for the pages that will be using your new control. To do this either add the @ Register directive in the top of your page, like this.

image

Or if you want all pages to have a reference to the control you can set a reference in the Web.config file.

image

To add the control to a page all you have to do is add a the markup for the control as you do with any other controls you use.

image


Visual Studio Tools Support for your Control

If you have a control that you distribute to other developers it will be a nice thing to set some additional attributes on your control that will make it easier for the users of your control to use it. Visual Studio supports a lot of attributes that will let the developers using your control to be more productive.

Adding Toolbox Support for your Custom Web Server Control

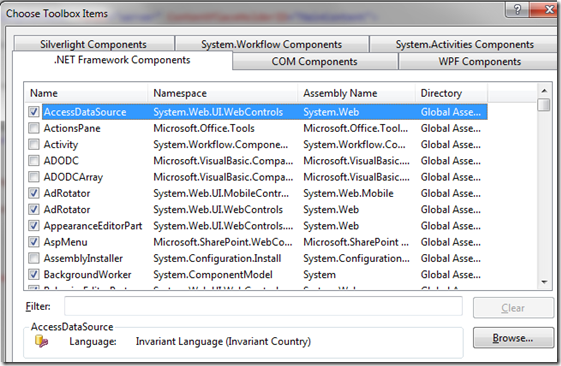
To add a control to the Toolbox window, the developer must use the Choose Toolbox Items dialog. This can be found under the Tools menu or by right click the Toolbox window.

image

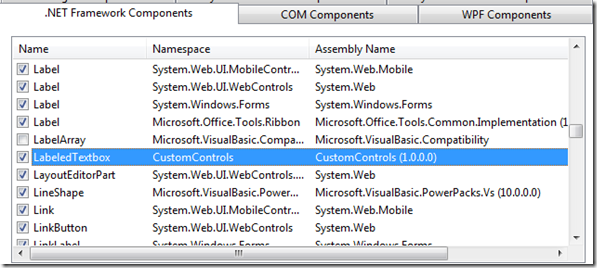
In this window the user can Browse the DLL of the custom web server control and click Ok. This will add the custom control to the list in the .NET Framework Components tab.

image

Hit Ok and the control is now visible in the Toolbox window in Visual Studio.

image

Defining a Custom Icon for Your Control

The default icon displayed on the left side of your control in the Toolbox window can be customized. To do this you add the ToolboxBitmap attribute, which is contained in the System.Drawing namespace, to you custom control class. This attribute allows you to specify a path to your custom icon.

Add a bitmap icon with the size 16*16 pixels. You can right-click your ASP.NET Server Control project and select Add New Item…, then select Bitmap. Now you can create your own custom bitmap icon from within Visual Studio. Remember to resize it to 16*16 pixels thou.

There is one more thing you need to do with your bitmap file. In the properties, for the Build Action select Embedded Resource.

image

This will ensure the icon is a part of the DLL and you do not have to have a copy of the bitmap itself when sharing your custom web server control with others.

Now add the ToolboxBitmap attribute on your custom control class, pass in the type of your control and the path to the icon.

image

You might have to re-add the control to the Toolbox window to get it to show properly, but when that is done it will be as beautiful as this shows.

image

Providing a Default Property for your Custom Web Server Control

You can specify a default property for your control that will be focused in the Properties windows when the user selects the property in Visual Studio designer. As in the example used throughout this it as the key property of LabelText that I would like to have focus on when the developer views the Properties window for the control.

To accomplish this all you have to do is add the DefaultProperty attribute, which is contained in the System.ComponentModel namespace, to the custom control class and pass in the property name as a string you want to focus on.

image

Now when viewing the properties the LabelText property will be in focus.

image

Defining Attributes for Your Control Properties

There are several attributes you can apply to the properties of your control to change how those properties are managed by Visual Studio. The following lists these attributes.

  • Bindable
    The Bindable property indicate whether a control’s property should be bound to data. Setting this value to Bindable(true), the property will be displayed in the DataBindings section of the property grid in Visual Studio. The default is Bindable(false).
  • Category
    You use the Category attribute to indicate the category (or group) in which the property should be displayed in the Properties window grid when a developer changes the Properties view to Categorized. As you can se in the previous example when using the DefaultProperty attribute the default category is Misc.
  • Description
    Use the Description attribute to provide a brief description of your property’s usage. This description is shown in the bottom of the Properties pane in Visual Studio when the property is selected.
  • DefaultValue
    You use the DefaultValue attribute to set a default value for your property.
  • Localizable
    You use the Localizable attribute to indicate whether your property should (or can) be localized. Setting Localizable(true) indicates that the property should be serialized as a localized resource.

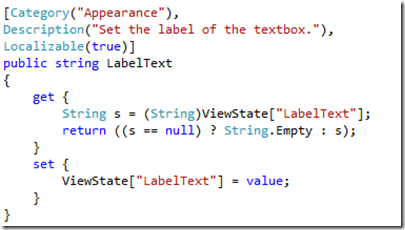
The following code shows an example of applying some of these properties to the LabelText property of the LabeledTextbox control.

image

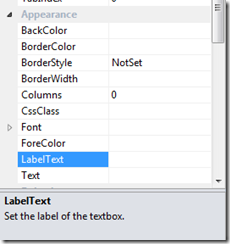
When viewing the Properties window it looks like the following.

image

Controlling the Markup Generated for Your Custom Web Server Control

When a built-in ASP.NET control is dropped onto the webpage it generates some code in the markup. The same does your custom web server control, and the code generated cam be controlled by setting the ToolboxData attribute, which is contained in the System.Web.UI namespace, on the control class.

The following is an example of the ToolboxData attribute added to the LabeledTextbox control.

image

Notice that the {0} placeholder contains the namespace prefix as defined by the webpage designer. The generated markup looks like this.

image

You can also provide the namespace prefix that is assigned to your control by the webpage designer by assigning the TagPrefixAttribute of the System.Web.UI namespace to the assembly that contains your custom control. To do so, add the attribute declaration to the AssemblyInfo class file in your control.

image

This will generate the following markup.

image

image

Creating a Custom Designer for your Custom Web Server

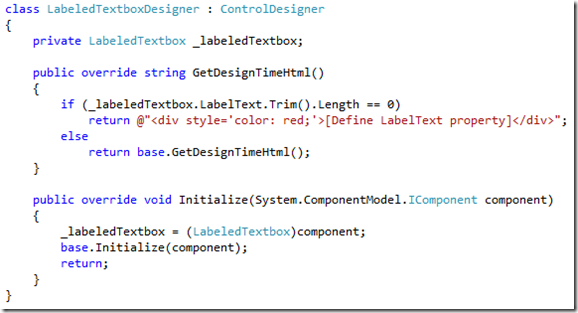
When working with controls in the design view, sometimes you want to alter the default rendering of the control. You might want to show a error message if some property is invalid for example. To do so, start by adding a reference to the System.Design.dll assembly in your custom server control. You then create a new class in you user control that inherits from the ControlDesigner class. This class will override the GetDesignTimeHtml method of the ControlDesigner class to render separate design-time HTML that can be set based on the property settings of the control instance. You then apply the Designer attribute to your control. To this, you pass an instance of your ControlDesigner class.

For example, lets say you want a error message to be showed if the developer have not specified the LabelText property in the LabeledTextbox control.

image

After this class is created, you can assign the DesignerAttribute to the user control class, as shown in the following code.

image

The result in the designer is the following.

image


Update

I’v added the source code for this post as a downloadable zip file.

Download the source here


Creating a Templated User Control

This is a follow up post on my previous post about user controls and the examples in this post is a continuation on the previous, so I recommend you read that before you begin reading this.

In the previous example I created the AddressControl with a static HTML table that dictated the layout of the fields for the control. Now, lets say you want other developers who use your control to specify how the fields in the controls should be presented. This is where you can use templated user control. Setting up your user control to use a template.

  1. Start by adding a user control file to you web application
  2. Add an ASP.NET PlaceHolder control to the user control’s markup. This is the placeholder for the templated layout. This control will be exposed as a property.

    image

  3. Create a class file that will serve as a naming container for your control. A naming container is simply a control container that allows you to search for a contained child control by using FindControl. This class will inherit from Control and implement the INamingContainer interface. It should also contain public properties for any data elements.

    image

  4. In your user control’s code-behind file, implement a property of type ITemplate. This property will serve as the template for users of your control and exposes the placeholder. The name you give this property is the name used for the template tag in any consuming page’s markup.
    Apply the TemplateContainerAttribute to the ITemplate property; this marks the property as a template. To this attribute, pass the type of the naming container class for binding data as an argument of the constructor. This serves to allow binding between the container and the template definition markup when the user control is added to a page.
    Also apply the PersistenceModeAttribute to the ITemplate property. You pass the enumeration value of PersistenceMode.InnerProperty into the attribute’s constructor.

    image

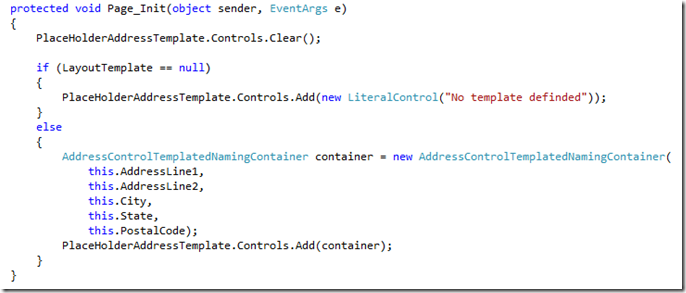
  5. Add code to the Page_Init method of the user control. Here you test for the ITemplate property. If the ITemplate property is set, you create an instance of the naming container class and create an instance of the template in the naming container. You then add the naming container instance to the Controls collection of the PlaceHolder server control.

    image

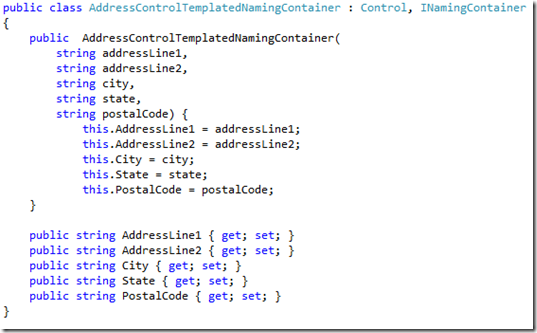
  6. You might also need to pass data from your user control to the naming container. This allows users to set the properties of your user control, and use them in the container. For these situations, you must define this data in your user control as properties that a developer who is using your user control can set. You then must pass a reference to this data to the naming container. This ensures that the naming container is updated when the property values changes on the user control. In this case the naming container class would look like the following.

    image

    And in the user control’s code-behind file you would pass in the values to the AddressControlTemplateNamingContainer constructor.

    image

Using the Templated User Control

Just add a reference to the user control on the top of the page.

image

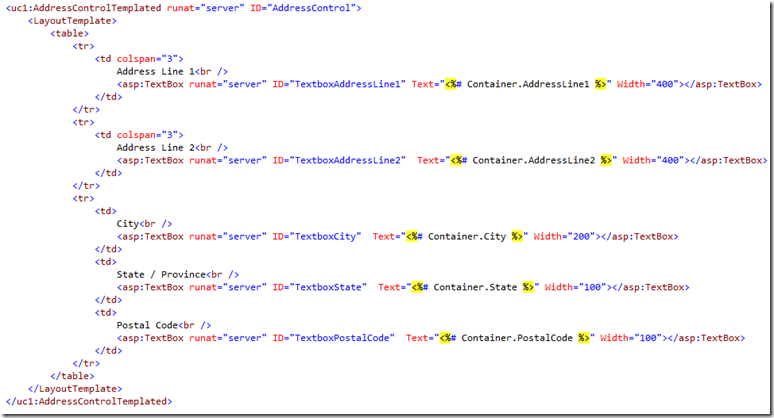
You then define the template for your control’s layout. This is done in the <LayoutTemplate> tag that was defined with the ITemplate property.

image

And you are finished, now you you’re the users of your control can set the layout of the control as they see fit.

Creating User Controls in ASP.NET

User controls are a great way of encapsulate functionality and reuse it in other places and conform to the DRY principle. You can have one or more controls in a user control and define properties, events and methods to the user control. A custom user control inherit from the UserControl class. A user control in ASP.NET is designed the same way normal pages is design, except a user control have @ Control directive at the top of the file and with the .ascx extension.

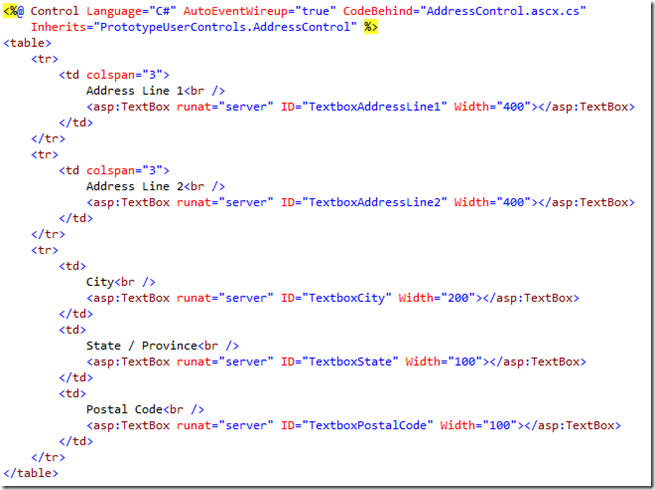
For the example of this post I will create a address user control. The following code shows the markup source of the user control.

image


Properties in a User Control

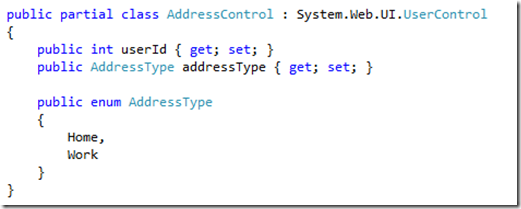
Often the developer need to configure the user control in some way, like passing the current user id. To allow this kind of functionality you can define properties on a user control. This properties can be set in the markup of the page where the user control is added, or in the page’s code-behind file. For this example we need two properties UserId and AddressType.

image

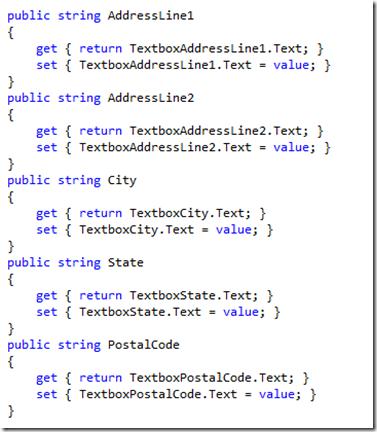
If you want to access the controls in a user control you need to expose each of those controls you want to access thru a property. This is because controls in a user control are declared as protected members of the control. This means they can not be accessed outside of the user control. If it is not absolutely necessary to expose the entire control then you should only expose its value. To expose the controls value in the address control you add the following properties to you user control code behind file.

image


Defining User Control Evens

A user control have the same events as a normal Page and are called in sync with the events on the page. For example. after the page Init event is called, the control’s Init event is called in turn. A user control can also cause a postback for the webpage to which they belong. When a user control causes a postback, its events are raised accordingly along with the events of the page. The event handlers for a user control are typically encapsulated in the particular user control. This to ensure the independent use of the control.

For example, lets say I want to find out the city based on the postal code. To do this we add a TextChanged event on the TextboxPostalCode control.

image

Then we need to make a change to the TextboxPostalCode control in the markup.

image


Passing Events Up to the Page

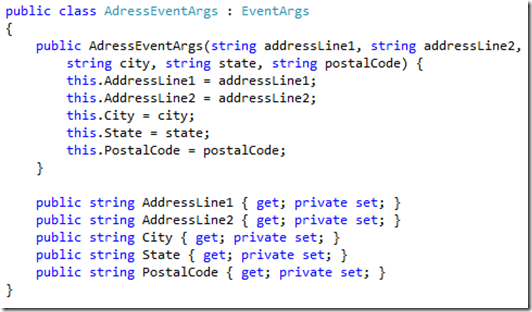
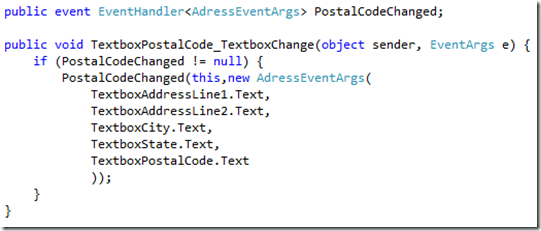
Sometimes you want a event caused by the control to be handled by the Page. For this to work you need to create a custom event argument class for your control that inherit from the EventArgs class. Lets change the previous example and let the page handle the event caused by the TextboxPostalCode control. First lets create a event argument class. In this example we pass all values, so the developer using our user control can decide what information she needs to handle the event.

image

Next step is to add code that declares an event to the user control’s class. Then you add code that handles the Textbox TextChanged event. Inside the TextChanged event, you raise your event back to the consuming page.

image

The last thing to do is to capture the event in the page using the control.

image


Adding a User Control to a Page

To add a user control to a page there is two things you need to do. First you need to reference it in a @ Register directive just under the @ Page directive like the following example shows.

image

Then you just add it as any other control you use, except that you use uc1 as a prefix and AddressControl as the control name.

image

You can also register a control in the Web.config file as the following example shows.

image

There is one more way of adding a control to a page, that is to dynamically add it in runtime. To do so you first create a new instance of the control by using the Page.LoadControl method and pass in the path to the control file. next you just add it to the Form or a Panel control using the Controls.Add method. To following example shows you how.

image

Now lets add a new AddressControl to the pnlWorkControl Panel.

image

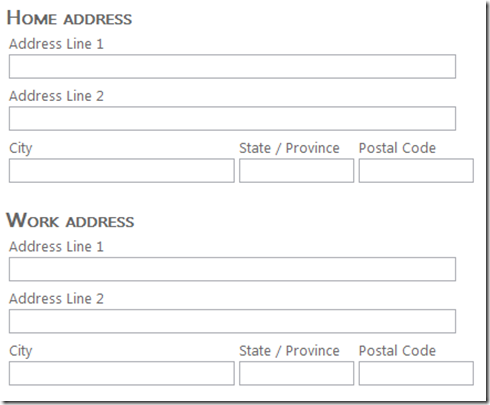
And the final result of this looks like this:

image

Generating a Default Local Resources automatically in Visual Studio 2010 for a single page

This is just a small tip I want to share for all you who are about to localize your ASP.NET applications.

You can use Visual Studio to automatically generate the default version of your local resource files. Doing so extracts the page and controls into a resource file, it adds the meta:resourcekey attribute to all controls in the page and creates the corresponding key in the local resource file.

  1. Open you webpage in the markup (Design view).
  2. From the Tools menu, select Generate Local Resource. This causes Visual Studio to perform the following tasks
  1. Generate the App_LocalResources folder if necessary.
  2. Create the local resource file with the name <filename>.resx and store it in the App_LocalResources folder. The file will contain resource settings for page elements (such as title) and control properties such as Text, ToolTip, Title, Caption and other string based properties.

If you want to know more about this you can read my other blog post about localization and globalization support in ASP.NET.

I hope this might save some time for you.

Creating Accessible websites in ASP.NET and why you should always do it

Accessibility in web development is a great thing for three reasons, it lets users that uses a screen reader, cant use a mouse and keyboard in a normal way or use some other technology to access a webpage, use your website, it also make it easier for people with a normal mouse and keyboard to use your website, and the last great thing about it it is very easy to implement.

Basically there is two major accessibility guide lines, there is the Web Content Accessibility Guidelines (WCAG) by the World Wide Web Consortium, and there is the Section 508 of the Rehabilitation Act by the United States government. Both are supported by Visual Studio.

ASP.NET Controls and Accessibility

ASP.NET controls are design to support accessibility, for example, the controls Login, ChangePassword, PasswordRecovery and CreateUserWizard use text boxes with associated labels.

Another way ASP.NET controls support accessibility is by allowing users to skip link text. Screen readers typically read the text of links from the top to the bottom of a page. Controls such as CreateUserWizard, Menu, SiteMapPath, TreeView and Wizard support the SkipLinkText property which allow the screen reader to skip past the links.

The principals of good Visual Accessibility

The following bullets lists some good practices when creating accessible websites.

  • Describe every image by using the AlternateText property to provide alternative text.
    If you want a longer description of a image, you can use the Image controls DescriptionUrl property and pass a URL to a HTML page that describes the image. For unimportant images you can set the Image.GenerateEmptyAlternateText property to True. This will tell screen readers to ignore the image.
  • Use solid colors for background, and use contrasting colors for text.
    This is a good practice for all users, and users who might not be able to perceive low-contrast text will appreciate this much.
  • Create a flexible page layout that scales correctly when text size is increased.
    Many browsers today allow you to increase text size. Be sure that your layout do not break if text size is increased.
  • Set the Table.Caption property to a description of the table.
    Screen readers can read the Table.Caption (generates the title attribute in a HTML table), and is able to tell the purpose of the date in the table. The ASP.NET controls that support the Caption property include Table, Calendar, DetailsView, FormView and GridView.
  • Provide a way to identify column headers.
    You can create table headers by using the TableHeaderRow class and setting the TableSection property to the TableHeader enumeration of the TableRowSection class, and thus render a <thead> element. When you create cells in with the TableCell control, your can set each AssociatedHeaderCellID property for the cell to the ID of a table header cell. This causes the cell to render a header attribute that associates the cell with the corresponding column heading. Controls that support this include Calendar, DetailsView, FormView and GridView.
  • Avoid defining specific font sizes.
    Use HTML heading tags such as <H1>, <H2> and <H3> instead of font sizes to support the user’s formatting options.
  • Avoid requiring client scripts.
    Not all assistive technologies can render client scripts, so you should use client script only for nonessential effects. For example the Validation control, you can set the EnableClientScript property to false to improve accessibility. Although I would not prefer this approach. It is a huge benefit to get the error message without a pustback call for users who do not use a screen reader.

Accessibility and User Input Forms

There is some guidance you need to comply with for input forms when developing a accessibly website. ASP.NET help you with it.

  • Set the DefaultFocus property for a form to place the cursor in the logical location where data entry begins.
  • Define the tab order in a logical way so the user can use the tab key to move to the next field.
    Use the controls TabIndex property to specify the tab order for the controls.
  • Specify default buttons for forms and Panel controls by setting the DefaultButton.
    When the user press the Enter key the DefaultButton property is used to handle which button will be "clicked”.
  • Provide useful link text.
    Just use common sense for link text. This is good for not only users who uses a screen reader but simplify for all users.
  • Define access keys for button controls by setting the AccessKey property.
    Just like desktop application you can set access keys for buttons and input fields. In ASP.NET you specify the AccessKey property with a character or number and the user can press Alt + Access key. To set the focus on the control.
  • Use Label controls and the AccosiatedControlID property to define access keys for textboxes.
    If you want a access key to set focus on a textbox you need to add a Label control with the AssociatedControlID property set to the ID of the textbox and then specify the access key on the Label control.
  • Specifying meaningful error messages in the Text and ErrorMessage properties of validator controls.
    As with the link text, a meaningful error message is useful for users with screen readers.
  • Use the Panel control to create subdivisions in a form, and define the Panel.GroupingText property with a description of the controls in that panel.
    Panels in ASP.NET uses the GroupingText property to create <fieldset> and <legend> HTML elements.

The following is a example of a good input form that is fully accessibly.

image

This will generate the following HTML output.

image


Testing Accessibility in Visual Studio

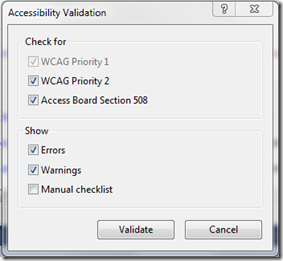
Visual Studio can test webpages or entire web applications for compliance with WCAG and Section 508 standards. To do this you do the following. In the Solution Explorer right click the page you want to test and select Check Accessibility… Then just press the Validate button.

image

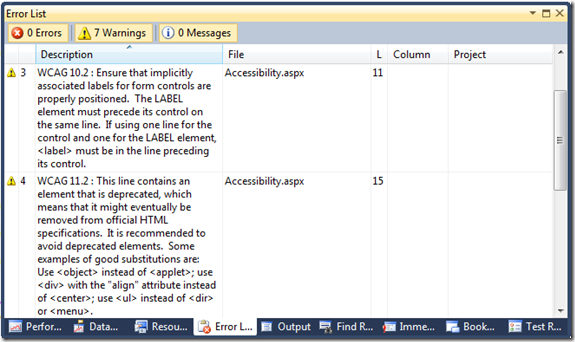
And a list of warnings will be showed in the Error List window, if your page is not compliant with the selected standards you validated against.

image

You can also validate your entire web application in Visual Studio. The process is the same as for single page validation except you select Check Accessibility… from the Tools menu.


Accessibility is very easy to implement and should be in the back of your head every time you create a website. It is not only good for people with different input devices and screen readers but for all users who uses your website.

Writing Globalized and Localized web applications in ASP.NET

When starting on a new web site project it is always a good idée to thing thru your globalization support strategy. Many times the customer sais the application will only be used in a single language and therefor do not need to implement support for multiple languages and cultures. But after a while the same customer comes back with new requirements that one additional language should be supported. If you have not implemented support for globalization and localization from the start you are in for some time consuming work. So it is a good way to implement support for multiple languages from the start, even if it is not in the road map to use it.

ASP.NET Resources

ASP.NET has two kind of resources, local and global. The local resource file is used on a single page only. While the global resources are shared across the entire site. A resource file is a simple XML file that allows you as a developer to externalize all globalization. This is a good thing because translator for example can just change the XML file using a XML editor and do not need to know anything about coding.

The resource file stores all strings in a data element under the root element. Where the name attribute is the key and the value element contains the current string.

<root>
<data name="AboutString" xml:space="preserve">
   <value>About</value>
</data>
</root>

Resource files uses a naming convention to support different languages and cultures. This naming convention is as follows.

  • filename.resx
  • filename.<languageid>.resx
  • filename.<languageid>-<cultureid>.resx

The first item in the list is the default resource file, this means that if the application do not have a localized version of the users language and culture it fill fall back to the default resources. The second item is a resource file for a specific language. So for example if I have a resource file Default.aspx.es.resx this file will be used for both Spanish speaking people in Spain and Spanish speaking people in Mexico. On the other hand have a resource file named Default.aspx.es-mx.resx this will be used for Spanish speaking people in Mexico, and for the Spanish visitors they will be seeing resources stored in Default.aspx.resx and the rest of the the world will use Default.aspx.resx.

Specifying the Language and Culture to use

ASP.NET automatically set what languageid and cultureid a user have based on the users browser setting or system settings. So you do not need to do anything manually. But lets say your users are using a web browser with another language setting and want to manually change the language of the website. Luckily there are a ways to of doing just that.

There are two properties in the Page class you can change.

  • Page.UICulture – This property takes a string representation of a languageid and cultureid (languageid-cultureid) use it to specify which language and culture the user have. This only specify the which global or local resources are to be loaded for the page.
  • Page.Culture – This property takes a string representation of a languageid use it to specify which language and culture the user have. This specify the date, number and currency formatting.

To programmatically set this properties you can override the InitializeCulture method in the Page class.

image

If you are using master pages, you would want to create a new Page Base class derived from the Page class and override the method in the new base class. This way you only need to write the code once. Then use it in all your pages. This is because the MasterPage class do not have a InitializeCulture method.

You can also specify the Culture and UICulture on the page level by declare it in the @ Page directive.

image

And to specify it on the site level you can specify it in the Web.config file.

image


Using Local Resource Files

All local resource files are stored in the ASP.NET specific folder called App_LocalResoruces, this folder can live in the root of your project or you can have one in each subfolder of your project. As said above a local resource file is connected to a single web page file in you project. This connection is by a naming convention as described also above.

You can attach controls and resources implicit by using a the meta:resourcekey attribute on your controls. For example.

image

This will tell ASP.NET that a resourcekey named ButtonString is connected to the SubmitButton control. Now because this is a implicit attach you can use the Text and ToolTip properties of the button control to specify different texts for those button properties inside the resource file.

image 

To explicitly attach resources to the button you do the following.

image

And the resource file will now look like this.

image

As you can see the use of implicit attach is a better approach, the draw down is it can not be used for global resources. When using global resources you need to use explicit attach.

If you want to localize text outside of controls in you web page you can use the ASP.NET control Localize.

image

The same here as in the button example. You have a implicit attach of the resource and need to use the Localize.Text property in the resource file.

image

Accessing local resources programmatically

You can also attach localized strings to a control property programmatically. To do this for local resources you use the GetLocalResourceObject method.

image


Using Global Resources

Global resources are like local resources except they are shared for the entire site. They are stored in the ASP.NET specific App_GlobalResources folder in the root of your website project. Another difference is that when attaching a global resource to a control you must do it explicitly.

Another great thing with global resources is that it Visual Studio uses code generation to create a class in the Resources namespace with the same name as the global resource filename. Inside this class it adds properties for each resource key and value. So you use global resources in a strongly typed fashion. For example if I have a SharedResources.resx file in my App_GlobalResources folder. And inside this resource file I have a resource named ButtonSave, I can use the following code to access it.

image

Another way of accessing the same resource programmatically is by using the GetGlobalResourceObject method.

image

Where you need to pass the class name (resource file name) as the first parameter and the resource name as the second parameter.

When attaching a global resource to a control you need to use explicit attach. And also specify in the class name.

image

Sending mail using Telnet

Quite often in my work I need to verify if a SMTP services is working on a server. Therefor this short post is a reminder to myself how you can send a mail with telnet.

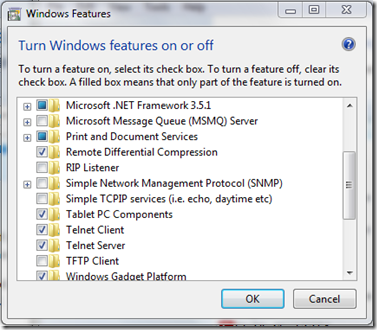
First make sure you have telnet installed. In the Control Panel \ Programs and Features
click Turn Windows features on or off.

image

There you can see two items, Telnet Client and Telnet Server

Then you need to open the command prompt. You connect to you SMTP service by typing the following command and hit enter.

image

The localhost is the server name. You will get the following on a successful connection.

image

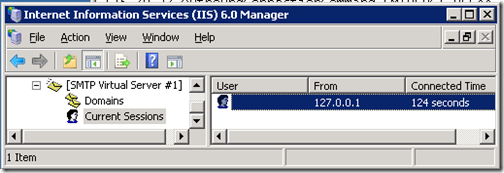
You can also se a new session in the SMTP manager

image

When connected to the SMTP you can use the following Telnet commands to send a mail.

HELO <domain name>
Use this command to specify from where you send the mail.

FROM MAIL:mail@example.com
From which mail address the mail should be sent from.

RCPT TO:mail@example.com
The address who will receive the mail.

DATA
A command to start typing the mail body and subject.
To add a subject to your mail you type
SUBJECT:My subject
and hit enter two times. After that you can start writing the mail body. When done with the mail body you type a single period (.) on a empty line and hit enter to send the mail.

QUIT
When you are done you type this command to quit the telnet connection and return to the command prompt.