You can read my other blog post about custom user controls if you are more interested in that type of custom controls.
A custom web control is a control that you write that inherits either from the WebControl class or from an existing web server control, e.g the Textbox control in ASP.NET. Each custom control contains the code necessary to render the control. The control can be compiled to a DLL file that can be shared among applications.
There is two ways of creating a custom web control, the first is to inherit from a existing web server control and extend its functionality. The second is to inherit from the WebControl class which provides a base set of functionality. With this functionality you can handle styles such as BackColor and so on.
Inherit from an Existing ASP.NET Web Server Control
As an example of this approach lets create a custom web server control that will inherit from the Textbox control, and let the developer add a label to the textbox. This control can later be used on all pages that need a textbox with a label.
The first step when creating a custom web server control is to decide how to develop it. I have chosen to create my control in a new ASP.NET Server Control project in Visual Studio. This approach gives us the ability to build our control as a DLL an share it with other applications. As you will se when the first class added to this project will contain a template of a custom web server control with a quite a few attributes set to the class, property and method, this will be explained later in this post.
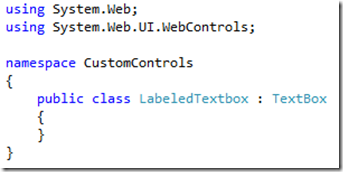
After adding a new class and set it to inherit from the TextBox class. You also need to reference the System.Web and System.Web.UI.WebControls.
For the label part of our custom web server control we need one property of type string that will be used as the label text.
The next step is to override a method from the TextBox class called Render. In this method we will add the rendering for the label. And at the end we call the base.Render() method to actually render the HTML of the inherited TextBox control.
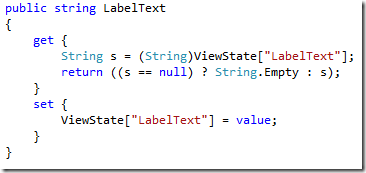
This control is almost finished, the only thing left to do is to provide the LabelText property with ViewState support. To do this you just change the get and set of the property to the following.
And the rendered control will look like this.
Inheriting Directly from the WebControl Class
Another approach to creating a custom web control is to create a control that inherits directly from the WebControl class. This is preferable when there is no existing control that provides enough default behavior similar to the control you want to implement. When inheriting from the WebControl class you, typically override the Render method to provide the HTML output you want for your control. How ever there is other Render methods shown below.
- Render
You can use the Render method when you want to control all output of your control’s HTML to the client. - RenderContents
You use this method to ensure that the HTML for your control is rendered between the appropriate begin and end HTML tags. When Render is called on your control, it will call three methods in a sequence: RenderBeginTag, RenderContent, and RenderEndTag. - RenderBeginTag and RenderEndTag
These methods are used to render HTML both at the beginning of a control listing and at the end. You override these methods when creating custom controls that display multiple controls between opening and closing tags. - RenderChildren
If your custom control has child controls inside its ControlCollection, you can call this method to ensure that each is rendered as part of the HTML output.
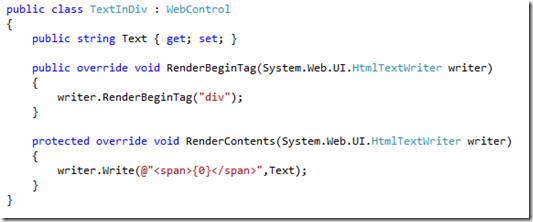
The following is a short example of how to create a control inheriting from WebControl.
The HTML markup generated by this control is the following.
Adding a Custom Web Server Control to a Web Application
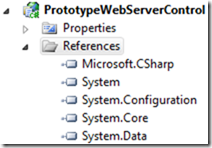
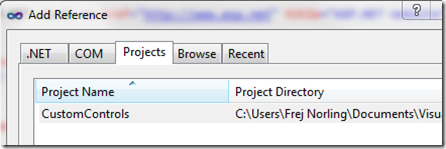
So far you have built a labeled textbox control, now lets see how we can add it to a web application project. In addition to use a custom web server control your project needs to reference it. If you develop your controls in the same solution you can right click the References and select Add Reference…
Select the project under the Project tab, and click Ok
When you build your project a copy of the DLL will be placed in your web application’s bin folder.
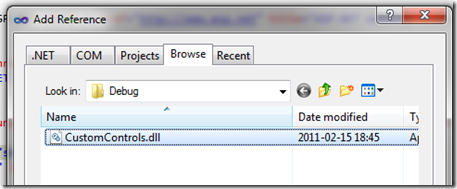
If share your control as a DLL assembly you can right-click the References in your project, select Add References and select the Browse tab instead.
Browse to the DLL file, select it and click Ok. A copy of the DLL will be placed in your web applications bin folder when you build the project.
Now you need to reference the assembly and namespace for the pages that will be using your new control. To do this either add the @ Register directive in the top of your page, like this.
Or if you want all pages to have a reference to the control you can set a reference in the Web.config file.
To add the control to a page all you have to do is add a the markup for the control as you do with any other controls you use.
Visual Studio Tools Support for your Control
If you have a control that you distribute to other developers it will be a nice thing to set some additional attributes on your control that will make it easier for the users of your control to use it. Visual Studio supports a lot of attributes that will let the developers using your control to be more productive.
Adding Toolbox Support for your Custom Web Server Control
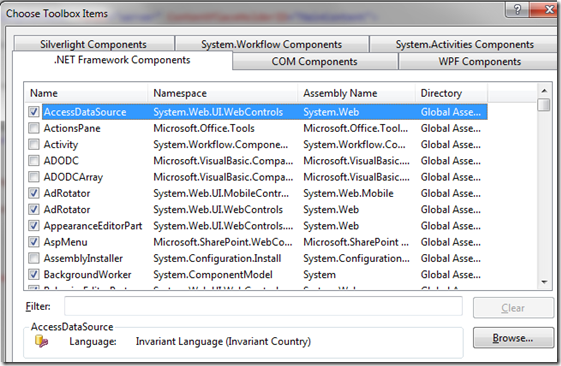
To add a control to the Toolbox window, the developer must use the Choose Toolbox Items dialog. This can be found under the Tools menu or by right click the Toolbox window.
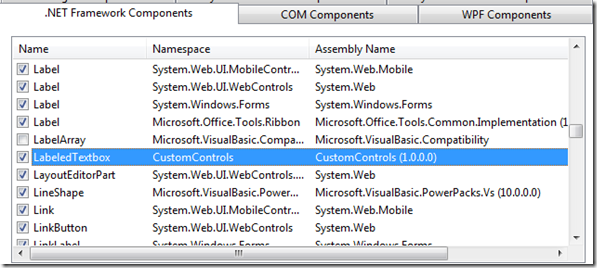
In this window the user can Browse the DLL of the custom web server control and click Ok. This will add the custom control to the list in the .NET Framework Components tab.
Hit Ok and the control is now visible in the Toolbox window in Visual Studio.
Defining a Custom Icon for Your Control
The default icon displayed on the left side of your control in the Toolbox window can be customized. To do this you add the ToolboxBitmap attribute, which is contained in the System.Drawing namespace, to you custom control class. This attribute allows you to specify a path to your custom icon.
Add a bitmap icon with the size 16*16 pixels. You can right-click your ASP.NET Server Control project and select Add New Item…, then select Bitmap. Now you can create your own custom bitmap icon from within Visual Studio. Remember to resize it to 16*16 pixels thou.
There is one more thing you need to do with your bitmap file. In the properties, for the Build Action select Embedded Resource.
This will ensure the icon is a part of the DLL and you do not have to have a copy of the bitmap itself when sharing your custom web server control with others.
Now add the ToolboxBitmap attribute on your custom control class, pass in the type of your control and the path to the icon.
You might have to re-add the control to the Toolbox window to get it to show properly, but when that is done it will be as beautiful as this shows.
Providing a Default Property for your Custom Web Server Control
You can specify a default property for your control that will be focused in the Properties windows when the user selects the property in Visual Studio designer. As in the example used throughout this it as the key property of LabelText that I would like to have focus on when the developer views the Properties window for the control.
To accomplish this all you have to do is add the DefaultProperty attribute, which is contained in the System.ComponentModel namespace, to the custom control class and pass in the property name as a string you want to focus on.
Now when viewing the properties the LabelText property will be in focus.
Defining Attributes for Your Control Properties
There are several attributes you can apply to the properties of your control to change how those properties are managed by Visual Studio. The following lists these attributes.
- Bindable
The Bindable property indicate whether a control’s property should be bound to data. Setting this value to Bindable(true), the property will be displayed in the DataBindings section of the property grid in Visual Studio. The default is Bindable(false). - Category
You use the Category attribute to indicate the category (or group) in which the property should be displayed in the Properties window grid when a developer changes the Properties view to Categorized. As you can se in the previous example when using the DefaultProperty attribute the default category is Misc. - Description
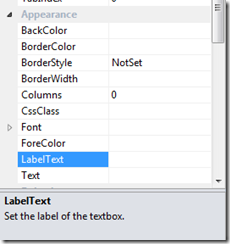
Use the Description attribute to provide a brief description of your property’s usage. This description is shown in the bottom of the Properties pane in Visual Studio when the property is selected. - DefaultValue
You use the DefaultValue attribute to set a default value for your property. - Localizable
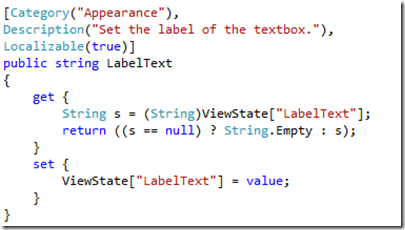
You use the Localizable attribute to indicate whether your property should (or can) be localized. Setting Localizable(true) indicates that the property should be serialized as a localized resource.
The following code shows an example of applying some of these properties to the LabelText property of the LabeledTextbox control.
When viewing the Properties window it looks like the following.
Controlling the Markup Generated for Your Custom Web Server Control
When a built-in ASP.NET control is dropped onto the webpage it generates some code in the markup. The same does your custom web server control, and the code generated cam be controlled by setting the ToolboxData attribute, which is contained in the System.Web.UI namespace, on the control class.
The following is an example of the ToolboxData attribute added to the LabeledTextbox control.
Notice that the {0} placeholder contains the namespace prefix as defined by the webpage designer. The generated markup looks like this.
You can also provide the namespace prefix that is assigned to your control by the webpage designer by assigning the TagPrefixAttribute of the System.Web.UI namespace to the assembly that contains your custom control. To do so, add the attribute declaration to the AssemblyInfo class file in your control.
This will generate the following markup.
Creating a Custom Designer for your Custom Web Server
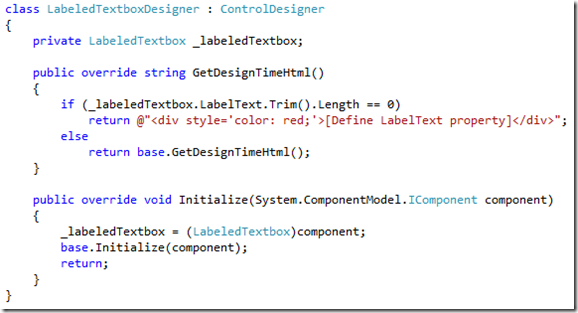
When working with controls in the design view, sometimes you want to alter the default rendering of the control. You might want to show a error message if some property is invalid for example. To do so, start by adding a reference to the System.Design.dll assembly in your custom server control. You then create a new class in you user control that inherits from the ControlDesigner class. This class will override the GetDesignTimeHtml method of the ControlDesigner class to render separate design-time HTML that can be set based on the property settings of the control instance. You then apply the Designer attribute to your control. To this, you pass an instance of your ControlDesigner class.
For example, lets say you want a error message to be showed if the developer have not specified the LabelText property in the LabeledTextbox control.
After this class is created, you can assign the DesignerAttribute to the user control class, as shown in the following code.
The result in the designer is the following.
Update
I’v added the source code for this post as a downloadable zip file.








June 14, 2011 at 7:34 am
please provide source code!!!!!!!!!
June 14, 2011 at 8:30 am
I’v added the source code for the examples in this post, you can download using the link at the bottom of the post. In all new posts I will add the source code from now on.
June 14, 2011 at 9:43 am
Kudos…thanks That helped a lot!;)
June 14, 2011 at 10:00 am
Good luck!
June 14, 2011 at 11:51 am
Good post…probably should expand it to include control state & not viewstate
June 14, 2011 at 12:47 pm
Thank you Paul!
It’s a good idea to include control state, thou I do not see that control state completely replaces view state, some controls would benefit from using view state and some from using control state, but I might do a post on control state soon.
Thanks for the tip!
September 27, 2011 at 1:06 pm
nice post it help so much to me.
September 28, 2011 at 5:55 am
You are welcome ashish!
November 6, 2011 at 1:25 am
Thanks, very useful.
March 28, 2012 at 10:10 pm
Does it works with VS 2008 ???
May 10, 2012 at 4:04 pm
Yes, I guess it will work.
June 12, 2012 at 8:12 am
When i add another custom control class file to the library and compile, it doesnt accept the new server control in the deault.aspx page. 😦 am i missing something?
August 14, 2012 at 6:24 pm
Was trying to build exactly your example LabeledTextBox, your way of doing it seems far more elegant. Much appreciated! Just one insight: While I haven’t tested it, I’m pretty sure you can re-write the line
return ((s == null) ? String.Empty : s);
to use the null-coalescing operator (??):
return s ?? String.Empty;
While it may be confusing for new coders, I find the ?? operator extremely handy for simplifying what would otherwise be ternary/conditional (?:) operator.
?? Operator (C# Reference): http://msdn.microsoft.com/en-us/library/ms173224.aspx
September 2, 2012 at 7:53 am
Very good idea. Thanks for pointing it out!
April 16, 2013 at 5:23 pm
So you only have to remember one single master password or select the key file to unlock the whole database.
Some people will rely on transferring data between flash drives and
their home computers, or sending what they wish to have printed to a proxy, such as Fed – Ex.
The sale for Samsung Galaxy S has reached 10 millionth mark, thus making it the most successful Android smartphone
so far.
May 31, 2013 at 10:34 pm
Very descriptive blog, I enjoyed that a lot. Will there be
a part 2?
June 7, 2013 at 3:45 am
It’s awesome to pay a visit this website and reading the views of all colleagues about this piece of writing, while I am also zealous of getting know-how.
January 30, 2014 at 1:23 pm
Thanks for your help. I have some confusion but after referring this article my all confusion has been removed.
January 6, 2015 at 9:12 pm
[…] Creating a Custom Web Server Control in ASP.NET using … – 15/4/2011 · 18 Responses to “Creating a Custom Web Server Control in ASP.NET using Visual Studio 2010”… […]
January 7, 2015 at 10:38 pm
[…] Creating a Custom Web Server Control in ASP.NET using … – Apr 15, 2011 · 18 Responses to “Creating a Custom Web Server Control in ASP.NET using Visual Studio 2010”… […]